Time to Customize
Okay. You have a blog. You made a test post. Now where do you go from here?
 It's now time to customize your options. You may not yet know if you are going to use your blog primarily to communicate with parents, as a classroom center, as part of literature circles, or a place to post student work, but there are some customizations we're going to have to take care of first. We'll take just one step at a time. Trust me, if this guy can do it - so can you! :)
Picking Your Template
First, Blogger doesn't offer all of its premade templates in the set up process. Click on TEMPLATE, then PICK NEW. You're going to want to do this first, otherwise, all your customizations and links will be lost in the transfer. One thing to note is that not all blogger templates have a links section. I recommend you pick a template that has this option available ready to go.
Removing Blogger's NavBar
 The CCPS BOE recently decided that blogs hosted through Blogger should have all tags removed so that students cannot inadvertently access inappropriate material. The NavBar has a "Flag" button (click this if you feel a blog hosts objectionable content and blogger tracks the blog) which is a good thing, but it also includes a "Next Blog" button. This button sends to you a completely random blog. This is the real reason why CCPS BOE advocates removing the NavBar.
Click here for a step-by-step guide for how to remove this feature. Make sure you preview and save your changes. You will have to republish your blog to view changes made. For disabling it in the new version of blogger try this link here. Another option is to cut and paste the following code from this page's source codeinto your blog:
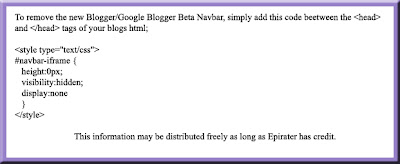 You can access this page's source code by right clicking, highlighting "View Page Source" and finding the code you need to cut and paste.
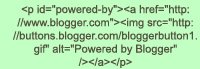
If you are still on the old version of blogger, it also a good idea to remove the "Powered by Blogger" icon/button at the bottom of the page as well. It does not appear that the new version of blogger has this. If you are working with an old template, you will need to scroll down until you see a strand of code that looks like this: Just highlight this one line of text and delete. Preview your changes (to make sure you did the right thing), save, and publish!
Modify Your Settings: Formatting
Scroll through and pick your settings. This will determine how many posts will show on your page (remember, new posts always appear first unless you edit the time stamp), how your pages are archived, and time stamped. (Time Zone: Eastern US)
Once done, be sure to click Save Settings.
Modify Your Settings: Comments
This is an important section to customize. This page modifies who can post to your blog. If you click "Only Registered Users" then only individuals with a blogger account can post. If you pick "Anyone" then anyone may post and anonymous posts are also accepted. If you pick "Only Members of this Blog" then only invited individuals may post. This ensures a completely private blog, but takes time to set up the student accounts necessary. On my blog, I set up over 40 student accounts (each needing their own private email account) and passwords so that my students can post in an isolated space.
New Feature!
With the new version of Blogger you may also block the content of your blog being read by anyone not expressly invited. This allows maximum privacy. However, all members participating or interacting through the blog must be invited with email addresses. This would be extremely useful if all students had student email accounts through CCPS. If you are interested in building an online forum for teachers and professionals to interact on but do not want it visible to the public, this may be the way to proceed.
You may also choose to act as a filter to moderate all comments on your blog - for more information visit: How Do I Moderate Comments on My Blog?
If your blog is mostly going to be used for an online newsletter for parents and you do not want to let anyone post comments, then you may want to switch the comments default to "New Posts Do Not Have Comments."
Choosing the "Time Stamp" of your choice allows you to easily track when posts and comments are posted.
 Comment Notification Email Address: This is essential to an educational blog. Simply enter the email account of your choice and ALL posts and comments published on your blog will be sent to this email account. This allows you to track and moderate blog use without checking on it daily. Simply read the posts as email ensuring that all blogging is school appropriate, or if you want, set it up so that all comments must be approved by you prior to publication.
 Modifying Your Settings: Archiving
This section allows you to choose between "No Archive," "Daily," "Weekly," or "Montly" archiving settings. These settings (like the others) may be altered once you get a feel for how your blog is working in your class.
Modifying Your Settings: Email
BlogSend Address feature: enter an email to receive a carbon copy of any post that you publish to your own blog.
 Modify Your Settings: Members
This is a crucial section of your blog settings. On this page it allows to to change who has administrative roles on your blog (i.e.: who can access the dashboard and modify your blog's template, etc...) along with inviting members to join your blog. This is where you can send individual invites to any individuals who have an email account. Once they accept the invite they may post to your blog if you've chosen a private blog by picking "Only Members of This Blog" under the comments section.
There are pros and cons to each type of blog. You will need to decide what type of blog best fits your needs. In any case, take the time to teach your students about how to stay safe online by never publishing personal contact information, etc... In my classroom, students are referred to by first name and sometimes last initial or student number.
 There you go! Most of the basic setup is done!
 It's now time to customize your options. You may not yet know if you are going to use your blog primarily to communicate with parents, as a classroom center, as part of literature circles, or a place to post student work, but there are some customizations we're going to have to take care of first. We'll take just one step at a time. Trust me, if this guy can do it - so can you! :)
Picking Your Template
First, Blogger doesn't offer all of its premade templates in the set up process. Click on TEMPLATE, then PICK NEW. You're going to want to do this first, otherwise, all your customizations and links will be lost in the transfer. One thing to note is that not all blogger templates have a links section. I recommend you pick a template that has this option available ready to go.
Removing Blogger's NavBar
 The CCPS BOE recently decided that blogs hosted through Blogger should have all tags removed so that students cannot inadvertently access inappropriate material. The NavBar has a "Flag" button (click this if you feel a blog hosts objectionable content and blogger tracks the blog) which is a good thing, but it also includes a "Next Blog" button. This button sends to you a completely random blog. This is the real reason why CCPS BOE advocates removing the NavBar.
Click here for a step-by-step guide for how to remove this feature. Make sure you preview and save your changes. You will have to republish your blog to view changes made. For disabling it in the new version of blogger try this link here. Another option is to cut and paste the following code from this page's source codeinto your blog:
 You can access this page's source code by right clicking, highlighting "View Page Source" and finding the code you need to cut and paste.
If you are still on the old version of blogger, it also a good idea to remove the "Powered by Blogger" icon/button at the bottom of the page as well. It does not appear that the new version of blogger has this. If you are working with an old template, you will need to scroll down until you see a strand of code that looks like this:
 Just highlight this one line of text and delete. Preview your changes (to make sure you did the right thing), save, and publish!
Modify Your Settings: Formatting
Scroll through and pick your settings. This will determine how many posts will show on your page (remember, new posts always appear first unless you edit the time stamp), how your pages are archived, and time stamped. (Time Zone: Eastern US)
Once done, be sure to click Save Settings.
Modify Your Settings: Comments
This is an important section to customize. This page modifies who can post to your blog. If you click "Only Registered Users" then only individuals with a blogger account can post. If you pick "Anyone" then anyone may post and anonymous posts are also accepted. If you pick "Only Members of this Blog" then only invited individuals may post. This ensures a completely private blog, but takes time to set up the student accounts necessary. On my blog, I set up over 40 student accounts (each needing their own private email account) and passwords so that my students can post in an isolated space.
New Feature!
With the new version of Blogger you may also block the content of your blog being read by anyone not expressly invited. This allows maximum privacy. However, all members participating or interacting through the blog must be invited with email addresses. This would be extremely useful if all students had student email accounts through CCPS. If you are interested in building an online forum for teachers and professionals to interact on but do not want it visible to the public, this may be the way to proceed.
You may also choose to act as a filter to moderate all comments on your blog - for more information visit: How Do I Moderate Comments on My Blog?
If your blog is mostly going to be used for an online newsletter for parents and you do not want to let anyone post comments, then you may want to switch the comments default to "New Posts Do Not Have Comments."
Choosing the "Time Stamp" of your choice allows you to easily track when posts and comments are posted.
 Comment Notification Email Address: This is essential to an educational blog. Simply enter the email account of your choice and ALL posts and comments published on your blog will be sent to this email account. This allows you to track and moderate blog use without checking on it daily. Simply read the posts as email ensuring that all blogging is school appropriate, or if you want, set it up so that all comments must be approved by you prior to publication.
 Modifying Your Settings: Archiving
This section allows you to choose between "No Archive," "Daily," "Weekly," or "Montly" archiving settings. These settings (like the others) may be altered once you get a feel for how your blog is working in your class.
Modifying Your Settings: Email
BlogSend Address feature: enter an email to receive a carbon copy of any post that you publish to your own blog.
 Modify Your Settings: Members
This is a crucial section of your blog settings. On this page it allows to to change who has administrative roles on your blog (i.e.: who can access the dashboard and modify your blog's template, etc...) along with inviting members to join your blog. This is where you can send individual invites to any individuals who have an email account. Once they accept the invite they may post to your blog if you've chosen a private blog by picking "Only Members of This Blog" under the comments section.
There are pros and cons to each type of blog. You will need to decide what type of blog best fits your needs. In any case, take the time to teach your students about how to stay safe online by never publishing personal contact information, etc... In my classroom, students are referred to by first name and sometimes last initial or student number.
 There you go! Most of the basic setup is done!
posted by M. Ells Perry at
1/06/2008 11:00:00 AM
![]()

